When it comes to software, there’s almost always an inverse relationship between ease of use and ease of development ; the easier something is to use, the more difficult it is to create.
Shopify’s new sections are no different; they make theme customizations more flexible and intuitive than ever before for merchants, but simultaneously introduce additional layers of complexity for developers looking to build them into a theme.
Don’t let that scare you though. Over the past six years, I’ve watched Shopify themes slowly evolve and mature, and sections are just the latest step in that journey, building on everything that has come before them.
Over the past six years, I’ve watched Shopify themes slowly evolve and mature, and sections are just the latest step in that journey, building on everything that has come before them.
I very recently went through the process of building sections into our own theme, Providence, and thought I’d share the approach I took, as well as a few things I learned along the way in the hopes making the prospect of doing the same thing yourself less daunting.
In this post, we’ll take a look at what sections are and how they’re structured, some things you should consider before getting started, and how to design a sectioning strategy by asking yourself some key questions. Finally, we’ll look at how you can put it all together and ease your way into development.
A brief introduction to sections: What is a Shopify Section?
Announced to developers for the first time at Unite 2016, Sections are Shopify's new way of empowering merchants to easily customize content and build page layouts, without having to touch or even see any code.
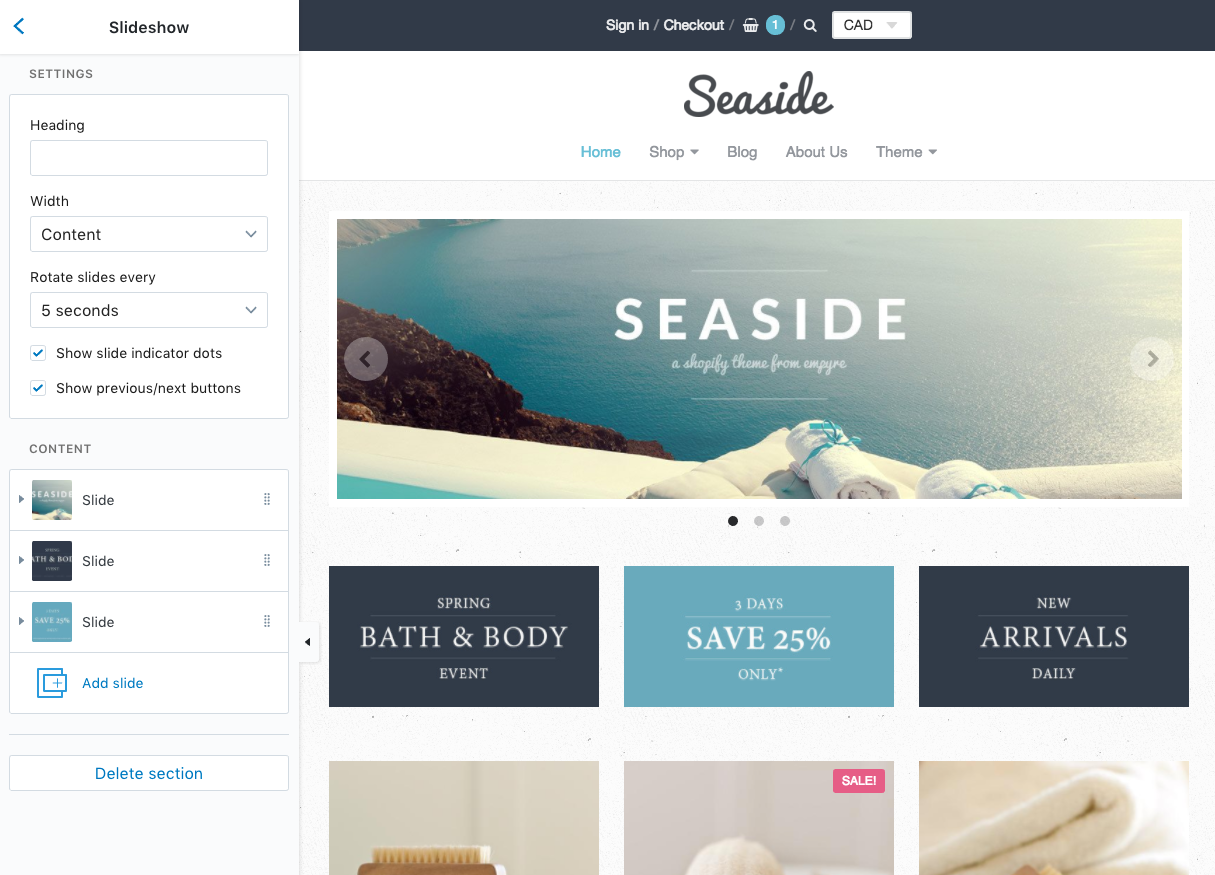
By pointing, clicking, dragging, and dropping in the Theme Editor, merchants can now assemble pre-made components into complex, fully responsive page layouts that would have previously required the hired help of an expert to put together.
The components are extremely flexible and can be made up of anything the developer chooses, from simple text to complete slideshows, image galleries, and product collections. Even better, because they’ve all been carefully designed to work together as a cohesive system within the theme, the end result looks professional regardless of how they're assembled.
Why create a Shopify section?
Sections sound like a great feature to have but what are the real benefits?
For the merchant it’s easy: sections save two of their most valuable resources: time and money. Having the ability to make content and layout changes without having to wait for a web developer allows for faster reactions to market demands.
A competitor just launched a flash sale and is gaining market share? No problem. With a few clicks (and not many more minutes) the entire homepage can be reconfigured to highlight a similar promotion. The Theme Editor even has an undo function that allows you to restore previous edits in the session. Perfect when making a bunch of changes on the fly.
I know what you’re thinking. Merchants that don’t have to hire as often for changes could be bad for your business as a Shopify Partner — you might be generating an income from those changes.
While it may seem that way at first, there are some big benefits and opportunities for you too. Instead of spreading out a high number of small projects over a long period of time, you could propose one large project of building sections into their current theme, so they can make changes any time they like.
Instead of spreading out a high number of small projects over a long period of time, you could propose one large project of building sections into their current theme, so they can make changes any time they like.
It’s a win/win: they’ll gain the freedom and be able to experiment with different content strategies, without seeing dollar signed attached to every new idea, and you’ll capture the revenue you would have generated from making those changes upfront and all at once. You’ll also free up significant resources, as quite often the time required to manage smaller projects is greater than the time required to actually complete them.
There’s also the opportunity to sell additional sections as add-on components down the road. Maybe you’ve just developed a new featured product section, and have reached out to all your existing clients to see if they’d be interested in buying it for their shop. Or maybe you have a flat rate for the initial Sections setup, and then offer a menu of Sections that the merchant can choose from, à la carte style. They decide on a few they’d like initially, and then any time they’d like a different layout or a new piece of functionality they could simply come back and pick from the menu.
To build or to buy?
There many ways to get creative with monetizing sections, but if you’re setting them up for a client, is it better to start with an already sectioned theme and tailor it? Or build them into an existing non-sectioned theme?
Starting with a sectioned theme can save a significant amount of time, but it can also impact profits due to the smaller project scope. Also, because it’s ‘off the shelf’ it might not be a perfect fit for the project, and with the modifications you have to make, you may find yourself not saving as much time as originally thought . That said, if you have a tight deadline and you can find an already sectioned theme that’s a close match to the client’s requirements, then it can be a great way to go.
Building sections into an existing theme takes a lot more time and forethought, but comes with the potential for increased profit margins and easier support. By creating the sections yourself, you’ll have a deep understanding of how they integrate with the theme, so you’ll be able to answer questions and troubleshoot issues much more efficiently and effectively. Additionally, by only creating the sections that are relevant to the project, you’ll keep the theme lean and easy to use for the client.
Building sections into an existing theme takes a lot more time and forethought, but comes with the potential for increased profit margins and easier support.
As you can see, each method has its pros and cons, and ultimately it’s up to you to decide which one is most suitable on a per-project basis. There’s no right or wrong choice but today we’re going to take a look at how to build sections into a non-sectioned theme.
You might also like: The Essential List of Resources for Shopify Theme Development.
Sections structure
Section files
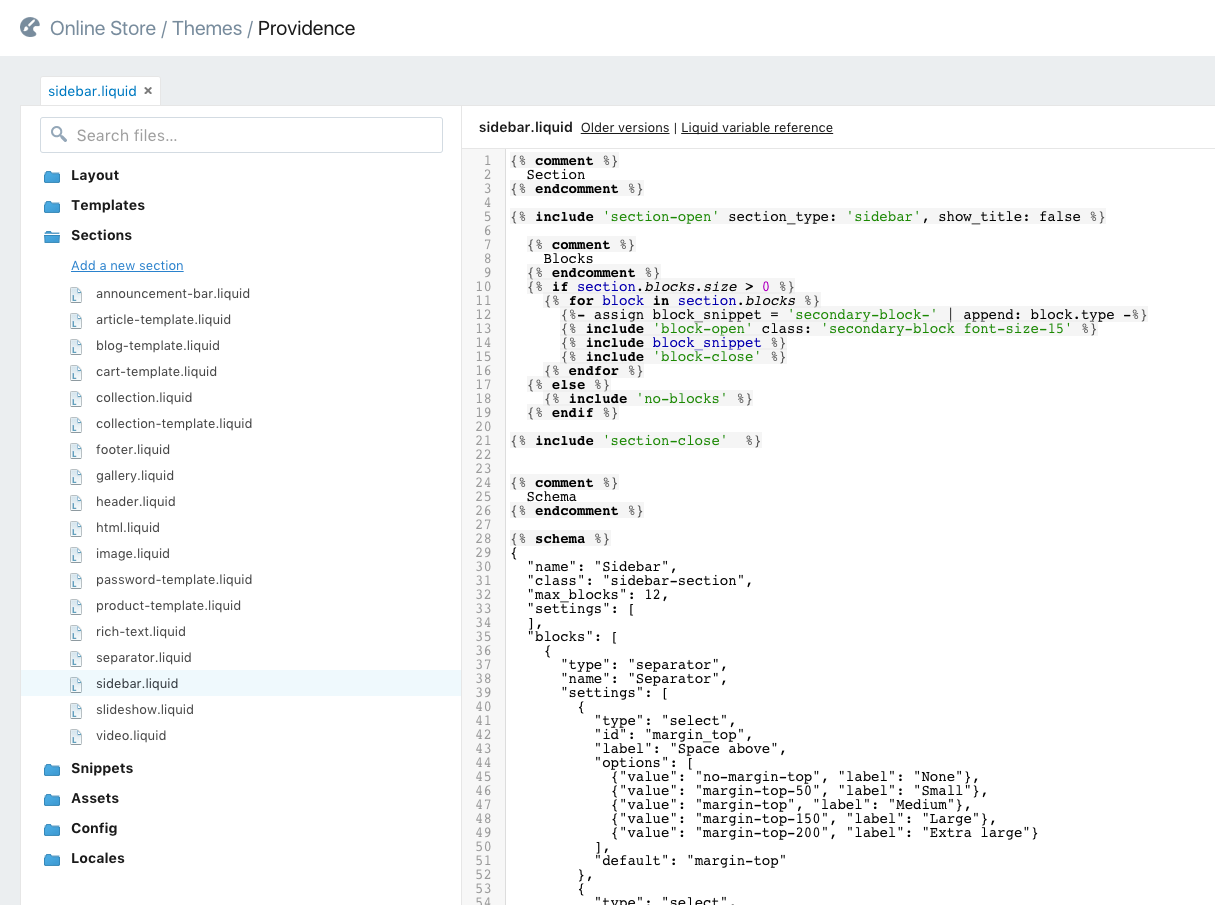
If you’re familiar with snippets, then you’ll feel right at home with the way section files are organized and integrated into themes. Each section file:
- Resides in a new top-level theme directory called Sections.
- Ends with a .liquid extension.
- Is included into a theme template file using a special Liquid tag called section (e.g.
{% section 'section-name' %}). - Doesn’t require the .liquid extension when being referenced by the section tag.
- Has access to the same global objects, tags, and filters as other templates.

One major difference between section files and snippet files is that section files do not have access to variables that have been defined outside of them. Conversely, variables that have been defined inside of a section file are not available outside of that file. For example:
# layouts/theme.liquid
{%- assign var_from_template = 'Hello from template' -%}
{% section 'header' %}
> {{ var_from_section }}

# sections/header.liquid
{%- assign var_from_section = 'Hello from section' -%}
> {{ var_from_template }}

# Rendered output
>
>
As you can see, the variable from the template isn’t output by the section, and the variable from the section isn’t output by the template.
But if a section file includes a snippet, then that snippet will have access to variables defined within the section file.
Section templates
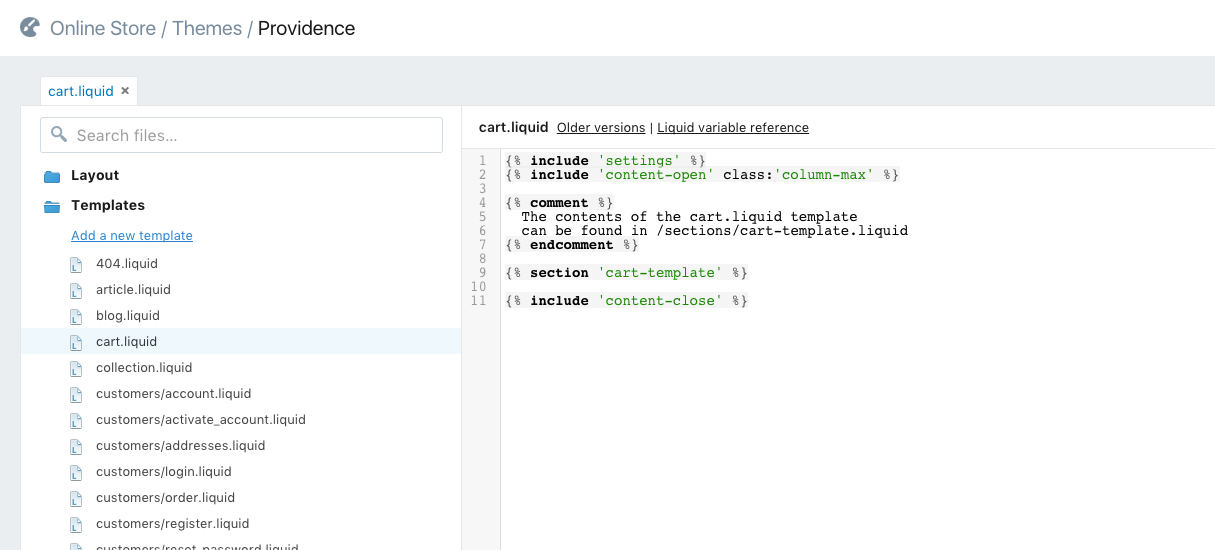
A common practice is to move most or even all of the code for a particular template file into a section file, in order to get template-specific settings. For example, the product.liquid template, with all of the code moved to a section, would look something like this:
# templates/product.liquid

{% comment %}
The contents of the product.liquid template can be found in /sections/product-template.liquid
{% endcomment %}

{% section 'product-template' %}
That way, when the template is viewed in the Theme Editor, the settings that are relevant to that template are automatically shown in the settings sidebar under the Sections tab, and the user doesn’t have to go hunting through the global settings to find them.
Template files you might want to consider setting up as sections include:
- article.liquid
- blog.liquid
- cart.liquid
- collection.liquid
- password.liquid
- product.liquid
Whether or not it makes sense to use a section as a ‘pseudo-template’ depends on the settings that you want to have for that template, and whether or not they need to be accessible outside of that template (see global settings vs section settings below).
If the template doesn’t have any settings directly associated with it, then there’s no need to worry about setting it up as a section.

Components of a section file
The structure of a typical section file looks something like this:
- Variable assignments (for section-specific variables)
-
{% stylesheet %}tag (if the section is to be fully self-contained) - Opening HTML for the section
- Block loop (if the section contains any blocks)
- Closing HTML for the section
-
{% javascript %}tag (if the section is to be fully self-contained) -
{% schema %}tag (for defining all of the information about the section)
The new {% stylesheet %}, {% javascript %}, and {% schema %} Liquid tags are specifically for sections, and can’t be used by any other theme files. We’ll take a quick look at each of them here, but the full details on them can be found in the Theme Sections article in Shopify’s Building themes documentation.
{% stylesheet %} and {% javascript %}
The ‘stylesheet’ and ‘javascript’ tags are used for bundling section-specific styles and scripts into the section, so that it becomes a self-contained module that can easily be reused across themes or shops. These tags are optional, so if using a section file as described isn't your plan then it’s best not to include them. Instead, the styles and scripts for your sections can be added into the main theme assets (e.g. theme.scss.liquid and theme.js).
{% schema %}
The ‘schema’ tag is really what makes a section a section. It contains a JSON object that describes all of the meta information about the section, such as the name, class, settings, blocks, max_blocks, presets, defaults, and locales.
Blocks
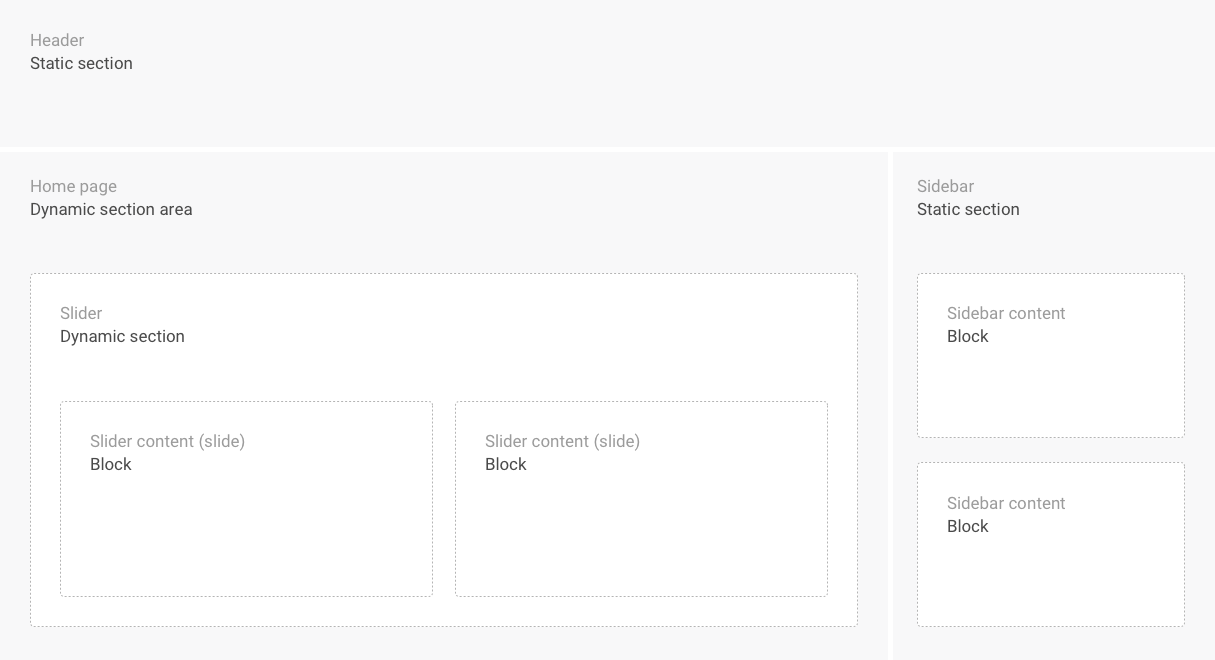
Think of blocks as sections within a section. They offer a huge amount of flexibility as they can have their own settings, contain anything you like, and be dynamically added, removed, and reordered in the sidebar of the Theme Editor. Here’s an example of a page outline using sections and their blocks:
1. Slideshow (section)
- Image slide (block)
- Video slide (block)
2. Rich text (section)
- Rich text (block)
- Page content (block)
3. Product collection (section)
- Product (block)
- Product (block)
- Product (block)
4. Image gallery (section)
- Normal width image (block)
- Normal width image (block)
- Wide image (block)
5. Footer (section)
- Rich text (block)
- Latest blog article (block)
- Newsletter signup (block)
- Menu (block)

You have complete control over which sections you build into the theme, and which blocks (if any) those sections contain. Coming up with a structure for everything that’s intuitive for the user to understand and navigate is key to developing a successfully sectioned theme.
You might also like: Creating Dynamic Color Schemes with Theme Options and Presets.
Things to consider before and during development
Static vs. dynamic sections
A section can be one of two different types: static or dynamic.
Static sections are sections that are explicitly included in the theme via the {% section %} tag. For example, to make the sidebar a static section you would add a {% section 'sidebar' %} tag to a theme layout, which would pull in the sections/sidebar.liquid section file.
Static sections can’t be dynamically added, removed, or reordered through the Theme Editor but the editor can be used to configure the settings for them. Each static section only has one ‘instance’ though — regardless of how many times it’s included in the theme — so the settings that are configured for the section are applied everywhere it’s displayed.
Since static sections are still sections, they’re able to contain dynamic blocks, so definitely keep that in mind when planning your sectioning strategy.
Since static sections are still sections, they’re able to contain dynamic blocks, so definitely keep that in mind when planning your sectioning strategy.
Dynamic sections are technically the same as static sections but with one major difference: they can be dynamically added, removed, and reordered through the Theme Editor. This gives the merchant a huge amount of control over their content and layout because not only can they easily add and configure any sections they’d like to have, but they can also do the same with any blocks contained within those sections.
Because dynamic sections are added and removed by the merchant, they’re not included using the same section tag as static sections. Instead, a dynamic section area is defined using a special tag.
Currently, only the index template is able to accommodate a dynamic section area so the tag to use there is {{ content_for_index }} .

Global settings vs. section settings
Prior to sections, the one and only place to add settings to a theme was the settings_schema.json file. By consolidating all of the theme options into a single location, the only considerations to be made are which settings to add and how to logically categorize them.
Even better, Shopify’s content style guide takes most of the guesswork out of the latter, by clearly defining which categories should exist and how they should be named. All of the settings defined in settings_schema.json are global, so they can be used in any theme file that has a .liquid extension.
Sections introduce an extra level of settings planning as they each have their own settings schema, which uses the exact same format as the settings_schema.json. The tricky part is that a section’s settings are only available within that section, so while settings defined in settings_schema.json can be used within sections, settings defined in a section’s settings schema can’t be used anywhere else in the theme.
Settings that are specific to a section should be defined in that section’s settings schema, and settings that are more general in nature, and/or need to be used in different areas of the theme, should be defined in the settings_schema.json.
Defaults and presets
Having a section be preconfigured with example content is extremely helpful to merchants, as they’ll be able to immediately see what the section could look like and how it might integrate with the rest of the page layout.
Defaults and presets serve a similar purpose in that they each define the initial content, settings, and structure of a newly added section. But there’s one major difference between the two: defaults are used for static sections, and presets are used for dynamic sections.
When deciding what to use for example content, consider what would be most helpful or appealing to the merchant when they first see the section in action. Use the opportunity to highlight unique or interesting section settings that might otherwise be missed, and try to avoid using filler text such as lorem ipsum. Instead, let the section describe itself and what it could be used for, or make it as much of a realistic representation as possible.
Theme editor JavaScript API
As sections are added, removed, and changed in the Theme Editor, the HTML for them is re-rendered and dynamically updated in the DOM of the preview without refreshing the page. This can cause problems for sections requiring JavaScript because any scripts that are run on a page load event, such as $(document).ready(), aren’t run again as sections are added.
Thankfully, the Theme Editor JavaScript API fires convenient DOM events out to the preview window for section-related actions, such as the loading and unloading of sections and blocks.
By listening for events, such as shopify:section:load, you can (re)initialize any relevant JavaScript so that your sections function properly as the page is being updated. Shopify also recommends you remove any bindings that are no longer needed when a section is removed, by using the shopify:section:unload event.
More information on the available events and how to use them can be found in the Theme Editor JavaScript API area of the Theme sections documentation page.
Getting started
Now that you have a fairly good overview of what sections are and how they work, it’s time to get started on building them into a theme by walking away from the computer.
Deciding what to section
The first step towards sectioning a theme is purely conceptual. Think about the overall structure of the theme, and the individual components it’s made up of. Does it have a header? A footer? A sidebar?
What are all the possible areas that could potentially be converted to sections? If you’re building in the sections for a client, they can offer some valuable input here. Which parts of their shop are they constantly making changes to, and/or wish they had greater control over?
Now, make the move to analogue and write every possible area out in a list so that you can carefully review each one to judge its merit. You’ve already identified that the area could be converted to a section, but now you need to know if it should be.
You’ve already identified that the area could be converted to a section, but now you need to know if it should be.
You want to make things easier for the merchant, not more complicated, so imagine that the area has already been converted to a section and visualize using it. Ask yourself the following questions:
- What are the real benefits of having this area be a section?
- What are all the possible blocks this section could have (if any)?
- What kinds of blocks will maximize the value of the section (if any)?
- What kinds of settings should the section have?
- What kinds of settings should each block have?
- Is having this area be a section useful and intuitive, or completely unnecessary?
The ultimate goal here is to come up with an overall strategy made up of sections, blocks, and settings that offer real benefits and that you plan to build into the theme, so that once you get to development, the process is smooth and efficient.
You might also like: How to Submit a Theme to the Shopify Theme Store.
Putting it all together
With the sectioning strategy in place, it’s finally time to move to the digital world and get coding. To gradually ease yourself into the world of sections, consider following these steps:
- Choose the area of least complexity from your sectioning strategy (I’d recommend starting with an area intended to be a static section, instead of with the homepage). Begin the process of converting it to a section by cutting all of the code for the area out of the theme file, pasting it into a new file in the sections directory (e.g.
footer.liquid), and then adding a section tag (e.g.{% section 'footer' %}) back into the theme file, where the code used to be. - Start integrating the different components of a section file into the file you just created. Focus on simply replicating the existing functionality of the area at first, and then when that’s done and working you can move on to adding new components and features, via blocks and settings.
- Focus on one area at a time, and work through it to completion before moving on to the next one. Try to save the homepage for last; by then you’ll have a solid understanding of static sections so it’ll be easier to see how the dynamic sections work.
- Take a step back from the code every now and then, to try and see everything from the merchant’s perspective. Confirm that the reality of using the sections, blocks, and settings lines up with what you had visualized in the sectioning strategy. Don’t be afraid to make changes if it doesn’t.
Further learning with helpful resources
My goal wasn’t to make this the definitive guide to building sections, but instead to have it be the kind of article I wish I’d had when I was getting started with sections.
With that in mind, I’ve tried to answer all the questions and address all the confusion I can remember having back then, but there is far more to sections than I could possibly cover here, so I highly recommend you checkout the following resources.
They were invaluable to me when I was sectioning our Providence theme, and I’m sure they’ll be just as helpful for you on your path to mastering the power of sections.
- Introducing Sections for Shopify Themes
- Theme sections
- Liquid file requirements for themes submitted to Shopify's Theme Store
- Content checklist for themes submitted to Shopify's Theme Store
Read more
- Free Course] 10x Your Shopify Theme Development Skills with These Free Courses
- An Overview of Liquid: Shopify's Templating Language
- How to Upload Files with the Shopify GraphQL API and React
- Everything You Need to Know About Development Stores
- Building an Accessible Breadcrumb Navigation with Liquid and Shopify
- How to Use Alternate Templates in Shopify Theme Development
- How to work with Metafields when building Shopify themes
- How to Craft the Best 404 Pages for your Clients
- What it Takes to Build for Success on the Shopify Theme Store
- How to Personalize Shopify Themes with the customer Object

